Monday, December 19, 2011

DIY Antique Mercury Glass

Before the holiday season completely draws to an end, I wanted to share some of the mercury glass pieces I made recently. You've seen it in Pottery Barn and all of your friends are pinning it. Why not try it for yourself? It is super easy. Trust me. If I can make it after having 3 glasses of wine sugar cookies, you can easily do it.

First, head to Hobby Lobby and get yourself a can of this:
Don't forget your 40% off coupon! This little guy is expensive (Editor's note: This is the actual size of the can). I may, or may not, have actually cursed when I saw the $11.99 price tag.

Then, go around your house and collect all of the glass containers you have sitting around. Don't forget all those vases that come with the flowers Mr. VB gives you. Oh, and also grab that spray bottle you use on the dogs to get them to sit down and stop barking. Don't you just love being able to shop in your own house? Hoarding really does come in handy some times.

Next, mist the inside of the glass vase with the water. Then, spray with the Looking Glass spray paint. Wait for it to dry and do it again. Or, if you are impatient, spray again right away. The paint won't stick to the misted areas.

Toss in a candle and Voila!


I used a scrubber in some of the vases to wipe off some of the paint. Mine have a very light coat of the Looking Glass...be has heavy or light handed as you want!


Tuesday, August 30, 2011

Breakfast Table Gets a New 'Do

I am excited to be back {again} from a hiatus. Well, maybe I've been working on this project for two months. Or, maybe the hours of sanding ust felt like months!

I repainted this set almost two years ago. In decorating years, that's like 17 years. Here's how it has looked since it's last paint job:


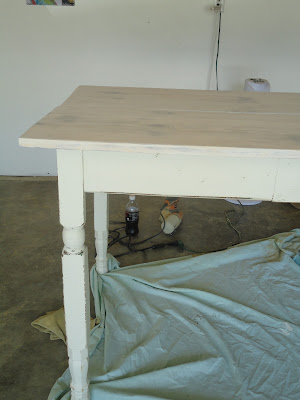
So, we dragged it out to the garage for a little TLC. Here's a closer look at the top. Not digging the stain.


So, I took out my BFF (my little palm sander) and, with 80 grit paper, started sanding. And sanding. Then I sanded some more. And it started to look like this.

After about an hour, I had one WHOLE side sanded. At this rate, I'ld be done just in time for Thanksgiving dinner. 


Then, the unimaginable happened. My BFF overheated. RIP little guy.


So, I headed out to Home Depot and got a new BFF.

A BFF with a lifetime warranty.


And, I started sanding again. My new BFF is stronger and much faster. And comes with 60 grit paper.


I got it down to the bare wood. To make it smooth, I went over it again with a 100 and then a 220 grit paper.


At first, I was going to stain the top. But, I've always loved what Layla at The Lettered Cottage did with her dining room table, so I ditched the staining plans and went for paint. I made a whitewash mix of 50/50 water and white paint (Swiss Coffee by Behr is a staple in our house).

Here's what it looked like after a couple coats:


Here's when things got a little crazy. I wasn't really liking this look, so I did a couple of dry brush coats with the Swiss Coffee (without water mix). For dry brush, dip your brush in the paint, wipe most of the paint off and paint away. Then I got out  my little jar of Valspar Antiquing Glaze and lightly painted some on. A little goes a long way!


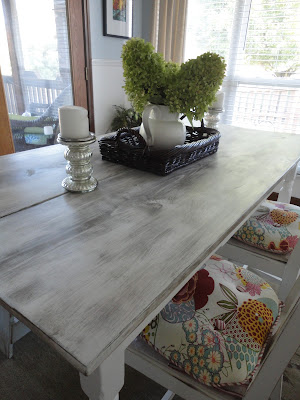
I did another coat of the whitewash and this is what I was left with. Pure LOVE!

But, wait -- I'm not done!


It was a little harsh, so out came my BFF again and using the 220 grit, I lightly sanded and smoothed out the table. Ta-Da!


I also gave the legs a coat of Swiss Coffee (getting rid of the previous distressing). I love the way it turned out!


My bench and chairs are a bit off, now. I'll be making some changes to those soon. But, I love the new look of the table. What do you think?

Linking up to a few parties this week!


Photobucket

Tuesday, May 31, 2011

DIY Raised Garden Bed

After a nearly three-month home project lull and two week vacation, we jumped right back into DIY projects. Well, some of us may have been dragged -- but let's not point fingers.

First up: a raised garden for the backyard. This is a progression from our playground garden of last year that consisted of herbs, tomatoes and peppers. We had the following cut at Home Depot:

2 10-foot lengths of 2x8 boards
2 3-foot lengths of 2x8 boards
4 12-inch 4x4 posts

We adapted ours after the one found here at Sunset.com. You can find detailed instructions there or use my highly technical explanation below.

Secure boards and posts together to make a big rectangle with short, stubby legs.
See -- that wasn't so hard, was it?
Dig holes to fit the four posts. This photo may or may not be upside down.
Place the legs in the holes.
Fill with approx. 12 bags of soil. Make sure you have someone strong like Mr. VB to carry all those bags. They are heavy!
Plant way too much fruit, veggies and herbs for your little space.


Total cost of the project (with lumber, soil, truck rental and plants) was just under $200. But, think of the cash we'll save on eggplant, squash, watermelon, tomatoes, peppers, brussel sprouts, basil, oregano, rosemary, and strawberries. Have you seen the price of a strawberry lately? And, don't even get me started on tomatoes.