Showing posts with label Annie Sloan Chalk Paint. Show all posts

Saturday, November 9, 2013

DIY: Steel Wool and Vinegar Wood Stain

We are in home project overload right now. We're closing on our new house on Wednesday (YAY!) and it's a mad dash to get everything ready. One of the things on our to-do list was to freshen up our computer desk. We picked up this table several years ago at an antique store...it's already been thru a couple of makeovers since we brought it home. Here's what it looked like when we bought it:


I've been wanting to try a steel wool and vinegar stain for awhile. And, once the table top was completely stripped down, I knew it would be the perfect piece. There's tons of tutorials and "recipes" out there...here's what we did:


 1. Soak steel wool (we used medium) in a jar of vinegar. The longer it sits, the rustier it will get and the darker the result. This is what it looked like after one week:


 Here's the table top all sanded down. Nice, smooth and bare.


2. Use a paint brush (or cloth) and brush on the rusty vinegar mix. Don't forget to shake it up and get all the "good stuff" that settles at the bottom.


Here's what it looked like halfway thru. What a difference!


3) We let the vinegar stain soak in and wiped it down. The finish looked duller -- but, definitely looked like aged wood.

 
 4) Then, we applied one of our favorite wood conditioners/finishers: Howard's Feed-N-Wax. It's made from beeswax and orange oil and really brings out the wood and deepened the color.


5) Next up was Annie Sloan's soft clear wax (for extra protection)...and here's the finished look. The base and legs were painted with ASCP in Aubusson Blue, with Paris Grey underneath. I waxed it with liming wax, however I don't think it had much of an impact.

I'm totally loving it and will definitely be using this technique again. Super cheap and super easy!

Steel Wool and Vinegar Stained Table

Steel Wool and Vinegar Stained Table
 

Thursday, February 21, 2013

Handpainted Ottoman

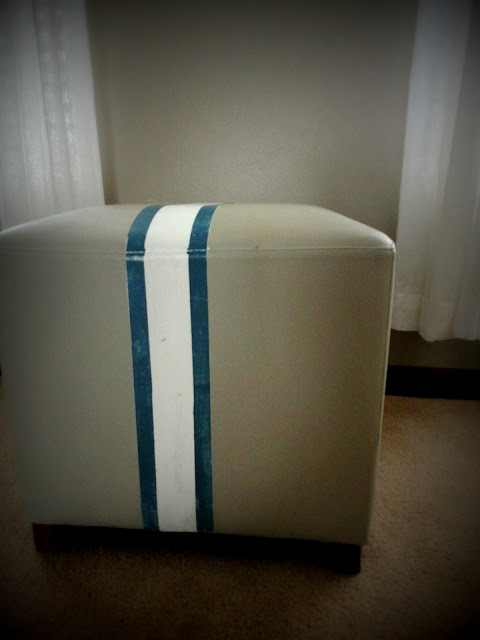
 It's true what they say, you can paint ANYTHING with Annie Sloan Chalk Paint! Take this pleather ottoman for example. We picked up a pair of them for super cheap about five years ago. They've been moved to various rooms in the house and up until last weekend were sitting on the back porch.

They were cold and depressed.

I knew Annie could cheer them up.


I put several coats of ASCP in French Linen on it.


Then, using some 3M ScotchBlue painters tape, I added some stripes.


My lines weren't perfect, so I took a light sanding block to the entire ottoman to distress it. Then, gave it a good rub down of Annie Sloan's dark wax. The wax sealed it up real good and made the entire surface sooo smooth. Like buttah.

annie sloan chalk paint ottoman

Doesn't it look much happier?


Monday, November 19, 2012

Painted Sideboard Reveal

I've been waiting all week to show you the finished sideboard! It's been so dark outside before I leave for work and when I come home, I haven't been able to snap some good pics. Until now!

This piece was found by my mother-in-law, JoAnn, who passed away last November. So, it has special meaning for us. She loved to go antiquing and we had very similar tastes. We were always sharing our latest antique store finds and this was a beautiful piece that she picked up. We miss her so much...I  just hope she likes what I did with it!

We debated keeping the top stained, but as you can see below, there are some stains on the top. And, I wasn't really up for sanding or stripping it all down. Also, some of the wood inlay was chipping off in spots and I was afraid that would get more damaged. The shelf on the inside is a little warped, too. But, other than that, it's in great shape!

BEFORE
 
sideboard with Annie Sloan Chalk Paint
Sideboard Before
I started by dry brushing it with Annie Sloan Chalk Paint in Pure White. Basically, I never put alot of paint on the brush and I didn't cover it completely. It was a pretty light coat.
sideboard with Annie Sloan Chalk Paint

Next, I painted it in ASCP Paris Grey. I didn't do a very heavy coat of this either. And, applied it really thin in some areas. It really helped when I started distressing it.

sideboard with Annie Sloan Chalk Paint

sideboard with Annie Sloan Chalk Paint


 Then, I went over it again and added some of the Pure White in different areas and the Martha Stewart Metallic Paint in Vintage Gold. I really had no plan to this...I just added it in different places.

sideboard with Annie Sloan Chalk Paint

sideboard with Annie Sloan Chalk Paint

Then I started sanding! In hindsight, I should have done this in the garage, as it was pretty messy. And, I'm now banned from distressing in the house. But, it just isn't as toasty outside!

I heavily distressed it on the top and front. You can just slightly see where some of the gold peeks thru.
sideboard Annie Sloan Chalk Paint

sideboard Annie Sloan Chalk Paint

Then, I applied a coat of Annie Sloan's dark wax and buffed it until it was buttery smooth. I absolutely love it! There are so many different "layers" to the finish. Hints of white, grey, gold and the natural wood coming through. The dark wax gives it a nice antique look and darkens up some of  the paint.

sideboard Annie Sloan Chalk Paint

sideboard Annie Sloan Chalk Paint

This isn't the ideal spot for it -- I want it in a room where there is more contrast with the walls. But, this is the only spot we have right now. It's my little Annie Sloan corner!  I'm glad I stepped out of my comfort zone and added some of the gold highlights.

sideboard Annie Sloan Chalk Paint

Would love to hear your thoughts...do you like the gold accents? Does it "naturally" blend in? Thanks for taking the time to stop by!

Linking to these great sites:


Wednesday, November 14, 2012

Painted Sideboard Sneak Peek

Last night I started working on this antique sideboard. It has some really great elements to it (carved details on the trim and legs) and I wanted to try my hand at a few new techniques. I'm hoping to finish it up tonight, but here's a peek at what it looks like so far. Forgive me for the camera phone pics...I just took these quickly this morning.

I was inspired by a couple of videos: This dry brushing tutorial from Shaunna West at Perfectly Imperfect. Also, this video by Virginia Weathersby is a great example on how to add the gold accents.

I'll be practicing my dry brushing skills with two ASCP colors and have incorporated a gold paint. I went with a paint that Martha Stewart sells. If you look closely below, you can see it in the carved trim.

distressed side board annie sloan

I love the way it is turning out...I can't wait to show you the finished piece later this week!

Thursday, November 1, 2012

Weekend Plans: Paint, Paint, Paint

I started this post as a way for you to take a look at what we've been working on for our last two shows of 2012. Now, it's become more of a to-do list of everything that needs to be done for next weekend's event: the Chandler Hill Annual Harvest & Holiday Market. This one is super close to our house and Chandler Hill is one of our favorite wineries. It will be a great place to meet some new people.

It's going to be a busy weekend, but here's what we'll be finishing up. We'll have alot of home decor items for this show. Chalkboards, mirrors, vintage frames. We've also put together a cute wall vase using recycled wine bottles.

Red Door Furniture Co

Red Door Furniture Co

Jeff's been working on a bar/buffet table that I'm really excited about. I'm looking forward to styling it next weekend. In the meantime, it will be getting a coat of paint on the legs. I'll be trying a new distressing technique and if I'll goes well, I'll share it next week!


If you are in the St. Louis area, come join us Saturday, Nov. 10th from 11:30 a.m. - 4:30 p.m. There's a great line-up of vendors. As well as the usual picturesque atmosphere and fantastic wine!


Monday, October 22, 2012

Wet Distressing with Annie Sloan Chalk Paint

I've been wanting to paint a gold picture frame ever since I took part in an Annie Sloan Chalk Paint demo in July. So, when I spied this large, old frame at the antique store, I knew it would be perfect.


The cracks and scrolls are calling out to be distressed!


First, I gave it a coat of AS Paris Grey.


One of the techniques we used in the workshop was wet distressing. Once the paint is just dry, take a damp cloth and wipe off the paint. This removed the Paris Grey, but didn't scratch the gold underneath.

annie sloan wet distressing

annie sloan wet distressing

Then I took some Pure White and brushed that on. I didn't completely cover every surface. That's one of the things I love about AS paint....you don't have to be perfect.

annie sloan wet distressing

Then, some more wet distressing and distressing with fine sandpaper.

annie sloan wet distressing

 After that, it was a coat of AS dark wax. It made everything POP! And, once the wax was rubbed in and polished, to is buttery smooth.

annie sloan wet distressing

annie sloan wet distressing

It has the most perfect antique French look! To finish it off, I'll be adding some twine to the middle section. It will be a cute way to display jewelry or photos.


It has great depth and looks like there are so many layers...yet it was really a simple process!

annie sloan chalk paint


annie sloan wet distressing

Linking to:
The Girl CreativeDIY Show Off