Showing posts with label DIY. Show all posts

Monday, October 15, 2012

Hand Painted Deer Antlers

I've been meaning to show off my last quickie paint project. I'm loving the recent antler trend...and love the painted look even more! A few weeks ago, I taped off sections of these antlers and brought out my Annie Sloan Chalk Paint (Paris Grey and Country Grey). A light coat of spray acrylic gave it a glossy finish. I think it would make a great rack for jewelry or as a centerpiece. What do you think?

hand painted deer antlers

hand painted deer antlers

hand painted deer antlers

hand painted deer antlers


Linking to:

Tuesday, September 4, 2012

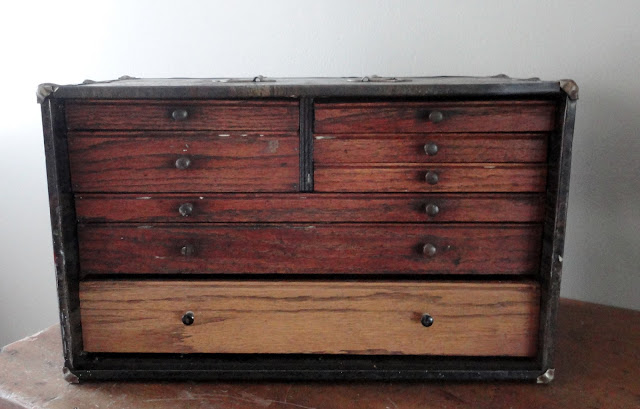
Antique Dentist Box Update

I'm pretty excited about this latest project. I loved it the minute I saw it -- it's the perfect desktop or jewelry organizer. Even on sale, it was a bit more than I wanted to spend. But, I knew once I spruced it up that it would be a great piece.

The tag said it was an antique dentist box. You can see on the top where there might have been a handle. A quick Google search brings up some that are similar...but don't quite look the same.

Antique Dentist Box

Antique Dentist Box
The door on the bottom is not original and the inside was covered in a nasty green "carpet" -- which I ripped out. Then I got out my Annie Sloan Chalk Paint. The first layer is French Linen. The second is Pure White mixed with some of the dark soft wax. Clear wax and distressing ensued.


Then I broke out the Mod Podge and added some pages from an old book for the bottom of the drawers.

And, here it is today:


Since the bottom drawer isn't original, I decided to leave it out. It's a great space to put larger pieces. We'll be bringing it with us to Strange Folk -- I hope others love it as much as I do! If not, I have just the spot for it ;-)

Linking to: Monday Muse, Make it Pretty Monday


Thursday, August 16, 2012

Stitched Paper Ideas

Happy Thursday! The weekend is almost here -- what crafting projects are you planning to do? Most of the time, a new project I find requires a trip to the store. This weekend, I'm vowing to use only what I have on-hand. And, create something that's on my to-do list for Strange Folk Festival.

Recently, I've been playing around with stitching paper. It added a pop of color to the thank you cards for our Etsy shop:

Red Door Furniture Co. Packaging

It's an easy and cute way to make my own little banner notecards from scraps of fabric.


I also created some garland out of old maps for a friend's baby shower (sorry for the pic...it's all I have!). It was some trial and error. One thing I learned was to set the machine on a straight stitch, to the longest stitch possible.


Last week I made some of these wine bags, which I plan on selling at the Strange Folk Festival. I want something unique to package them in and remembered a pin I saw recently. In just a few minutes, I created these bags using pages of an old book, a thank you stamp and scrapbook brads. The hanky wine bags fit inside perfectly!


Have a great weekend! Thanks for stopping by!

Saturday, August 11, 2012

Red Cross Vintage Suitcase Tutorial

I'm currently obsessed with the Pacific Northwest and during one of my recent internet searches, I came across Seabold Vintage Market. It's located on Bainbridge Island in Washington -- and is exactly the type of shop I would love to have some day.


I absolutely love this Red Cross necklace they have:

Red Cross Necklace from Seabold Vintage

And this Red Cross pillow made from vintage linen...

Red Cross Pillow from Seabold Vintage

All the red cross symbols inspired me to do a make-over on an old suitcase I picked up for $15 at the antique store. It's the third suitcase and/or trunk I've picked up in several weeks. Jeff is questioning whether they are really a trend right now, or if I am just getting ready to move out. I like to keep him on his toes.

I've also been wanting to try out Annie Sloan Chalk Paint on a suitcase. They say you can paint anything with it...so, here's my victim:


It's really sturdy and the leather is rugged and worn. I hadn't even payed close attention to the plate on the front until Jeff pointed it out to me. Amelia Earhart Luggage. Very cool!


The interior was stained, so I ripped it all out.


I taped up everything I didn't want painted. 


Then, I took out my Annie Sloan Chalk Paint in Pure White and gave the suitcase a nice thick coat.


I printed off the Red Cross symbol on cardstock, taped around the cardstock, removed the template and painted the exposed symbol with ASCP in Emperor's Silk.


Once it was dry, I pulled all of the tape off....and fell in LOVE!


Even Jeff said, "Wow!"

I still have to fix the inside (my Mod Podge plan was a BIG fail), but I loooove how the outside turned out. The paint took to the suitcase very well and totally transformed it! I would love to hear other non-furniture ASCP projects people have done...let me know!

Linking to
DIY Show OffFunky Junk's Saturday Nite SpecialFine Craft Guild

Friday, August 10, 2012

Vintage Hanky Wine Bags

Sometimes when you don't succeed, you just have to try again. And, again. And then you end up with something super cute.

Vintage Hanky Wine Bag

Last week, I picked up several vintage hankies at an antique shop. My first thought was to sew pillows with them. I didn't have a pattern...and was just winging it. Let's just say, it didn't turn out (Fail #1). In an effort to salvage the hanky, I ripped the project apart and realized I had enough to create a mini wallet. While it is super cute and holds my business cards perfectly, as you can see, it is a bit crooked (Fail #2).


At the same time, I've been wanting to make wine bags. And, hankies just happen to be the perfect size to wrap around a bottle! I sewed a 1/4" seam at the bottom and up one side and flipped it inside out (so the seams are on the inside). And, ended up with these adorable wine bags. No pattern or cutting required. They'll be a cute way to dress up gifts...or just dress up a bottle of wine we're enjoying for dinner!

Vintage Hanky Wine Bags
I'm linking to these fabulous parties: Beyond the Picket Fence, Shabby Nest, Whipper Berry, The 36th Avenue, DIY Showoff

Thursday, August 2, 2012

Red Door Signage

Honestly, sometimes it's hard to function when you are inspired. If you're anything like me, it takes over your life. You can't sleep. You can't focus. All you can think about is how you are going to channel this inspiration into something incredibly awesome. Then you make lists of all the awesome things you will accomplish. It's really quite distracting.

My recent inspiration is really a journey...

Inspiration Timeline

Last Week

I attended a conference and trade show for my "real" job. While I was excited to represent my org. and meet some new people, I was really looking forward to one exhibitor in particular: Annie Sloan Unfolded. I am completely blaming them for my recent restless nights and endless lists.

I eased into things slowly...taking a walk over to the display and checking out the samples.

Annie Sloan Unfolded Display
Before I knew it, I was signed up for a hands-on (hour long!) demo. I have the Paris Grey Chalk Paint...and I quickly learned that I've been misusing the paint and waxes incorrectly. I fell in love with the newest color, Provence.

Hands-on Painting Class
As you can see, I took it very seriously.


LOOOVE the new color: Provence.
This was achieved by letting the Chalk Paint dry and then wiping off with a damp cloth.

Monday

I walked away from the Annie Sloan Chalk Paint demos with a looong list of painting projects and a bag full of Chalk Paint samples. I immediately ran to the St. Louis stockist for a new brush and AS soft wax.
 

August 2011

It's hard to believe that we've been meaning to start Red Door Furniture Co. for nearly a year before we officially made the leap this spring. Here's a shot of Jeff with a door we found last year. He sanded off the old finish and stained it a dark brown. While the color looks beautiful, we bought this door not paying attention to how thin the main panel was.  Originally, we wanted to put glass only on the panel, but we were afraid it wasn't sturdy enough to support it. So, we dragged it down to the basement...


Today

One of the items on our to-do list is festival/fair signage. And, of course, we wanted a door! Since this guy won't make a great table and has been sitting in our basement for nearly a year, we knew it would be perfect.

I painted it with a couple layers of chalkboard paint (I also used the spray paint chalkboard paint, which I didn't really like). Then I put on a couple layers of Emperor's Silk by Annie Sloan.


Once it was dry, I used a couple of distressing techniques. From the on-hand demos, I learned that it is best to apply the clear wax before sanding. However, the STL stockist was out of the clear and I was impatient...so, I distressed with some 220 grit sandpaper. I also used a damp paper towel (which I liked best for this piece). Then, I applied a coat of the dark soft wax. The door feels like butter!

I absolutely love how it turned out. We are hoping to be vending at different festivals and fairs in the area, so having a chalkboard sign is going to let us personalize what we say for each venue.

Linking to Serenity Now, The Dedicated House, Domestically Speaking, Sweet Little Gals, 36th Avenue, The Shabby Creek Cottage, Shades of Amber


Follow my blog with Bloglovin
Tuesday, July 24, 2012

5 Tips on Selecting a Door for a Table


One of our favorite places to go hunting for old doors and windows is Cherokee Street. Known as Antique Row, it offers store after store filled with antiques, architectural pieces, vintage clothing and jewelry...and much more.

One of our first stops is at Riverside Architectural Antiques. This is a typical scene of what we dig through.


The Painted Cow is also a great place to find one-of-a-kind items...

Over time, we've learned what to look for when selecting doors that will ultimately become tables. A couple things we consider:
  1. What do you want the finished table to look like? Our tables range from those with a more finished look (complete with table skirt and glass to even it out), to simply a table on legs. Whatever look you are going for, think about how you will put it all together and will the door work with your plan?
  2. Symmetry: Depending on the look you are going for and the tools available, take a close look to see if the door is symmetrical. Alot of the time, the bottom rail is wider than the top. If this is something you are concerned about, you'll need the proper tools to even it out.
  3. If you plan on going with a stained top, does the door need to be stripped? This process can take up alot of your time. You can find doors that have already been stripped (or, the store might offer it for a fee), but you usually will pay more for these doors. If you love the chippy paint on the door, then this isn't an issue!
  4. Sturdiness: Think about how you want the finished product to look. Will you have a large piece of glass on the top, like this table? Or, if there are smaller panels, will it be more like this table? If you don't care for an even surface, knock on the panels to make sure they are sturdy. We opted to not put glass on this table. The panels are thick and can stand to have vases, books, etc. placed on them.
  5. For me, the older and chippier a door, the better. However, as we have been leveling the symmetry on older doors or removing rusty nails, doors have cracked and chipped apart. Pay attention to the quirky details you love in the door...will they end up causing you more problems as you are putting your piece together?
There's one other thing Cherokee Street is known for...its Mexican food. As we all know, antiqing is hard work!