Showing posts with label painting tips. Show all posts

Tuesday, July 15, 2014

Marble Top Step Down Dresser in Kitchen Scale

Sometimes, you just get that feeling, ya know? I've been in major need of a new Miss Mustard Seed's Milk Paint display. I knew immediately that this old, marble top step down dresser was going to looove milk paint.

And it didn't disappoint!

Marble Top Step Down Dresser in MMSMP Kitchen Scale

Here's it is before. The marble tops come off and are HEAVY! Trust me. I almost broke my foot. (And, now I know why the bottom of the top drawer has a crack in it).


It's missing its mirror, but I love how there are two height levels on the top. Great for showing off all of our MMSMP products! And the marble is in beautiful condition!


I did no sanding and no prep (and no bonding agent). The drawers are painted in Kitchen Scale (one of my favorite colors). I mixed in a little Ironstone and used that for the outer frame. It gives is just a bit of contrast.


Marble Top Step Down Dresser in MMSMP Kitchen Scale

This dresser chipped up beautifully! I couldn't have asked for a better piece to demonstrate just what MMSMP can do. It got a light smoothing with sandpaper and a coat of furniture wax.

Marble Top Step Down Dresser in MMSMP Kitchen Scale

I didn't want the knobs to be a distraction, so I found these glass knobs at Hobby Lobby. Perfect!

Marble Top Step Down Dresser in MMSMP Kitchen Scale
Linking to:
Show Me What Ya Got
Anything Blue Friday
Creative Spark Link Party

Wednesday, May 21, 2014

Milk Paint Tip: Easy Chippy Technique

It's another rainy afternoon here in STL, so I thought I would post this sunny piece I just finished. Well, almost finished. I also wanted to share a chipping technique I accidently discovered {although, I'm sure I'm not the first to do this}.

So, here's the before. This dresser came with a taller "brother", but I've painted them differently and don't plan on them selling together. Both are unique pieces and I wanted them to have two different looks (I'll share the other piece in a later post).

Before


It was in pretty good shape when I got it. A little chipping veneer, but not bad. I loved the tall legs and old caster wheels.

I'm not typically a stencil/script person, but I wanted to try something new. I picked up the stencil below from a nearby shop, Dawn Lynz Surface Design. She does amazing work and has a great selection of stencils.

I used MMSMP in Mustard Seed Yellow and stenciled the writing in Ironstone {I carry both of these colors in the shop!}. It's finished with furniture wax.

After


I love how sunny and light it turned out. I think it would look cute in a nursery (as a changing table) or in a dining room as a buffet.


I had already painted the "brother" to this piece, so I knew I most likely wasn't going to get any chipping. Which I wanted. However, my laziness to just use hemp oil or a wax puck outweighed my desire for chippiness. But, decided to just let it go.

For the stencil, I had to tape it on with Scotch Tape to hold it in place. And, wouldn't you know, when I removed the stencil, a bit of paint came up here and there.

Almost like chipping!

So, I applied it in various places all over the piece. Any "chipping" you see actually came from where I applied the tape and then ripped it off! I did this before I waxed (the wax will seal the paint in and you most likely won't get this effect).

Miss Mustard Seed Yellow Dresser
Red Door Furniture Co. Dresser in Mustard Seed Yellow

 
While this method might be a bit unconventional --- it worked! I would love to know...what painting techniques have you accidentally discovered and now love?

Saturday, January 18, 2014

How to Use Milk Paint as a Stain

I'll admit, I'm fairly new to milk paint. I was always a little hesitant to use it, because of the whole "you don't know where it will chip" factor (Don't worry, we have things to help with that). And, the fact that you mix it yourself was always a little overwhelming.

During the last couple of months, I've been experimenting and using it more. I've discovered colors that I would never have chosen for a piece of furniture before, are now among my very faves. I have my preferred methods of mixing the paint. And, I love that I'm able to control the amount of coverage. For instance, did you know that by mixing in more water, you can use it as a stain? Which leads us to....

Milk Paint Stain

This is not an exact measurement and it doesn't have to be. I filled my container with water and then added a couple of scoops (tablespoons) of Miss Mustard Seed's Curio. Here's the coverage when mixed with the recommended ratio (1 part milk paint to 1 part water):


Here it is when mixed as a stain. You are looking for a watery consistency. The mix below had no "thickness" too it, like paint. It was a dark, watery mix. I mixed the milk paint and water in a container with a lid. Just put it all in, add the lid, and shake it up.

Milk Paint Stain

We used Curio to stain the workshop table we'll have in the shop. Jeff built the table out of Douglas Fir. I gave it a very light sanding to smooth it out. Here's what one brush of paint looked like:

Milk Paint Stain

And here's what it looked like as it soaked into the wood. Once I got it all painted, I took a rag and wiped it down. However, most of it had already soaked in.

Milk Paint Stain

Here's the finished product. I LOVE it. The finish doesn't resemble paint at all -- it totally looks and feels like it's been stained. We finished it with Howard Feed-N-Wax. It deepened the color and will help protect the top. Miss Mustard Seed's Hemp Oil would also be beautiful on this (I opted for Howard's because it's such a huge table).

Milk Paint Stain


If you are interested in using milk paint as a stain, we carry the entire line of Miss Mustard Seed Milk Paint in our shop. Stop in and visit on Feb. 1 at 1105 N. Second Street in St. Charles, or send me an email at info@reddoorfurnitureco.com.

Saturday, November 9, 2013

DIY: Steel Wool and Vinegar Wood Stain

We are in home project overload right now. We're closing on our new house on Wednesday (YAY!) and it's a mad dash to get everything ready. One of the things on our to-do list was to freshen up our computer desk. We picked up this table several years ago at an antique store...it's already been thru a couple of makeovers since we brought it home. Here's what it looked like when we bought it:


I've been wanting to try a steel wool and vinegar stain for awhile. And, once the table top was completely stripped down, I knew it would be the perfect piece. There's tons of tutorials and "recipes" out there...here's what we did:


 1. Soak steel wool (we used medium) in a jar of vinegar. The longer it sits, the rustier it will get and the darker the result. This is what it looked like after one week:


 Here's the table top all sanded down. Nice, smooth and bare.


2. Use a paint brush (or cloth) and brush on the rusty vinegar mix. Don't forget to shake it up and get all the "good stuff" that settles at the bottom.


Here's what it looked like halfway thru. What a difference!


3) We let the vinegar stain soak in and wiped it down. The finish looked duller -- but, definitely looked like aged wood.

 
 4) Then, we applied one of our favorite wood conditioners/finishers: Howard's Feed-N-Wax. It's made from beeswax and orange oil and really brings out the wood and deepened the color.


5) Next up was Annie Sloan's soft clear wax (for extra protection)...and here's the finished look. The base and legs were painted with ASCP in Aubusson Blue, with Paris Grey underneath. I waxed it with liming wax, however I don't think it had much of an impact.

I'm totally loving it and will definitely be using this technique again. Super cheap and super easy!

Steel Wool and Vinegar Stained Table

Steel Wool and Vinegar Stained Table
 

Thursday, February 21, 2013

Handpainted Ottoman

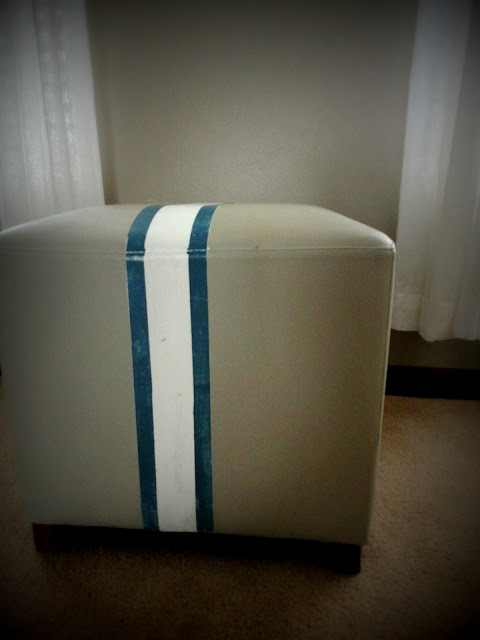
 It's true what they say, you can paint ANYTHING with Annie Sloan Chalk Paint! Take this pleather ottoman for example. We picked up a pair of them for super cheap about five years ago. They've been moved to various rooms in the house and up until last weekend were sitting on the back porch.

They were cold and depressed.

I knew Annie could cheer them up.


I put several coats of ASCP in French Linen on it.


Then, using some 3M ScotchBlue painters tape, I added some stripes.


My lines weren't perfect, so I took a light sanding block to the entire ottoman to distress it. Then, gave it a good rub down of Annie Sloan's dark wax. The wax sealed it up real good and made the entire surface sooo smooth. Like buttah.

annie sloan chalk paint ottoman

Doesn't it look much happier?


Monday, November 19, 2012

Painted Sideboard Reveal

I've been waiting all week to show you the finished sideboard! It's been so dark outside before I leave for work and when I come home, I haven't been able to snap some good pics. Until now!

This piece was found by my mother-in-law, JoAnn, who passed away last November. So, it has special meaning for us. She loved to go antiquing and we had very similar tastes. We were always sharing our latest antique store finds and this was a beautiful piece that she picked up. We miss her so much...I  just hope she likes what I did with it!

We debated keeping the top stained, but as you can see below, there are some stains on the top. And, I wasn't really up for sanding or stripping it all down. Also, some of the wood inlay was chipping off in spots and I was afraid that would get more damaged. The shelf on the inside is a little warped, too. But, other than that, it's in great shape!

BEFORE
 
sideboard with Annie Sloan Chalk Paint
Sideboard Before
I started by dry brushing it with Annie Sloan Chalk Paint in Pure White. Basically, I never put alot of paint on the brush and I didn't cover it completely. It was a pretty light coat.
sideboard with Annie Sloan Chalk Paint

Next, I painted it in ASCP Paris Grey. I didn't do a very heavy coat of this either. And, applied it really thin in some areas. It really helped when I started distressing it.

sideboard with Annie Sloan Chalk Paint

sideboard with Annie Sloan Chalk Paint


 Then, I went over it again and added some of the Pure White in different areas and the Martha Stewart Metallic Paint in Vintage Gold. I really had no plan to this...I just added it in different places.

sideboard with Annie Sloan Chalk Paint

sideboard with Annie Sloan Chalk Paint

Then I started sanding! In hindsight, I should have done this in the garage, as it was pretty messy. And, I'm now banned from distressing in the house. But, it just isn't as toasty outside!

I heavily distressed it on the top and front. You can just slightly see where some of the gold peeks thru.
sideboard Annie Sloan Chalk Paint

sideboard Annie Sloan Chalk Paint

Then, I applied a coat of Annie Sloan's dark wax and buffed it until it was buttery smooth. I absolutely love it! There are so many different "layers" to the finish. Hints of white, grey, gold and the natural wood coming through. The dark wax gives it a nice antique look and darkens up some of  the paint.

sideboard Annie Sloan Chalk Paint

sideboard Annie Sloan Chalk Paint

This isn't the ideal spot for it -- I want it in a room where there is more contrast with the walls. But, this is the only spot we have right now. It's my little Annie Sloan corner!  I'm glad I stepped out of my comfort zone and added some of the gold highlights.

sideboard Annie Sloan Chalk Paint

Would love to hear your thoughts...do you like the gold accents? Does it "naturally" blend in? Thanks for taking the time to stop by!

Linking to these great sites:


Wednesday, November 14, 2012

Painted Sideboard Sneak Peek

Last night I started working on this antique sideboard. It has some really great elements to it (carved details on the trim and legs) and I wanted to try my hand at a few new techniques. I'm hoping to finish it up tonight, but here's a peek at what it looks like so far. Forgive me for the camera phone pics...I just took these quickly this morning.

I was inspired by a couple of videos: This dry brushing tutorial from Shaunna West at Perfectly Imperfect. Also, this video by Virginia Weathersby is a great example on how to add the gold accents.

I'll be practicing my dry brushing skills with two ASCP colors and have incorporated a gold paint. I went with a paint that Martha Stewart sells. If you look closely below, you can see it in the carved trim.

distressed side board annie sloan

I love the way it is turning out...I can't wait to show you the finished piece later this week!