Showing posts with label Painted Furniture. Show all posts

Tuesday, July 15, 2014

Marble Top Step Down Dresser in Kitchen Scale

Sometimes, you just get that feeling, ya know? I've been in major need of a new Miss Mustard Seed's Milk Paint display. I knew immediately that this old, marble top step down dresser was going to looove milk paint.

And it didn't disappoint!

Marble Top Step Down Dresser in MMSMP Kitchen Scale

Here's it is before. The marble tops come off and are HEAVY! Trust me. I almost broke my foot. (And, now I know why the bottom of the top drawer has a crack in it).


It's missing its mirror, but I love how there are two height levels on the top. Great for showing off all of our MMSMP products! And the marble is in beautiful condition!


I did no sanding and no prep (and no bonding agent). The drawers are painted in Kitchen Scale (one of my favorite colors). I mixed in a little Ironstone and used that for the outer frame. It gives is just a bit of contrast.


Marble Top Step Down Dresser in MMSMP Kitchen Scale

This dresser chipped up beautifully! I couldn't have asked for a better piece to demonstrate just what MMSMP can do. It got a light smoothing with sandpaper and a coat of furniture wax.

Marble Top Step Down Dresser in MMSMP Kitchen Scale

I didn't want the knobs to be a distraction, so I found these glass knobs at Hobby Lobby. Perfect!

Marble Top Step Down Dresser in MMSMP Kitchen Scale
Linking to:
Show Me What Ya Got
Anything Blue Friday
Creative Spark Link Party

Monday, April 28, 2014

Vintage Cabinet Reveal

It's what's on the inside that counts. Right?

This vintage glass-front cabinet was one of the first pieces I found for the shop. I painted it with Miss Mustard Seed's Milk Paint in Boxwood and finished it with hemp oil. It has just minor chipping and distressing.


He's a handsome fella...but, hasn't drawn much attention since we've opened. I decided to add a little surprise to the inside (it was a little dark and dreary). I enlisted the help of our Facebook fans and got great suggestions (lots of people wanted to see the inside orange or a bold pattern). I opted for a coat of MMSMP in Grain Sack to brighten it up. I painted over a selection of vinyl arrows (I'm loving arrows right now, aren't you?).

Vintage Cabinet by Red Door Furniture Co.


I love how it turned out! Just the right bit of personality to dress him up. I gave it a light sanding to distress the back and arrows a bit.

Vintage Cabinet by Red Door Furniture Co.

He blends in more with our style and has been getting more attention. We thought about taking him home. I've got the perfect spot and think it would make for a great display for cocktails, glasses and barware.

He's going to stay in the shop a bit longer...hopefully someone will walk in and fall in love with him like I have!

Vintage Cabinet by Red Door Furniture Co.

Saturday, January 18, 2014

How to Use Milk Paint as a Stain

I'll admit, I'm fairly new to milk paint. I was always a little hesitant to use it, because of the whole "you don't know where it will chip" factor (Don't worry, we have things to help with that). And, the fact that you mix it yourself was always a little overwhelming.

During the last couple of months, I've been experimenting and using it more. I've discovered colors that I would never have chosen for a piece of furniture before, are now among my very faves. I have my preferred methods of mixing the paint. And, I love that I'm able to control the amount of coverage. For instance, did you know that by mixing in more water, you can use it as a stain? Which leads us to....

Milk Paint Stain

This is not an exact measurement and it doesn't have to be. I filled my container with water and then added a couple of scoops (tablespoons) of Miss Mustard Seed's Curio. Here's the coverage when mixed with the recommended ratio (1 part milk paint to 1 part water):


Here it is when mixed as a stain. You are looking for a watery consistency. The mix below had no "thickness" too it, like paint. It was a dark, watery mix. I mixed the milk paint and water in a container with a lid. Just put it all in, add the lid, and shake it up.

Milk Paint Stain

We used Curio to stain the workshop table we'll have in the shop. Jeff built the table out of Douglas Fir. I gave it a very light sanding to smooth it out. Here's what one brush of paint looked like:

Milk Paint Stain

And here's what it looked like as it soaked into the wood. Once I got it all painted, I took a rag and wiped it down. However, most of it had already soaked in.

Milk Paint Stain

Here's the finished product. I LOVE it. The finish doesn't resemble paint at all -- it totally looks and feels like it's been stained. We finished it with Howard Feed-N-Wax. It deepened the color and will help protect the top. Miss Mustard Seed's Hemp Oil would also be beautiful on this (I opted for Howard's because it's such a huge table).

Milk Paint Stain


If you are interested in using milk paint as a stain, we carry the entire line of Miss Mustard Seed Milk Paint in our shop. Stop in and visit on Feb. 1 at 1105 N. Second Street in St. Charles, or send me an email at info@reddoorfurnitureco.com.

Friday, December 13, 2013

Righting a Wrong

When it came to our dining room table, I had a vision. I knew what I wanted it to look like. At the time, I didn't want to paint it and stripping it was out of the question (I try to avoid that at all costs. I'm very impatient). I sanded a little...but, it pretty much remained that same.

So, I just went ahead anyway and applied liming wax, and ended up with this:


I wasn't entirely happy with it. It remained in the garage until about a month ago when we moved. Now, I see it every day. I glare at it. Sometimes I call it names. I had to do something.

First, I added some dark wax to the top. It covered and cleaned up the liming wax quite nicely. It's not back to it's original state, but it looks much better. You can see the difference in the pic below.


Then, I painted it. I used the Mustard Seed Yellow again from MMSMP. I've painted one other piece this color and it was a nice way to introduce yellow in another area of hour house (it also goes well with the chairs we painted and recovered). I didn't get much chipping at all, but areas sanded off really easily with a sanding pad.

Mustard Seed Yellow
Mustard Seed Yellow | Miss Mustard Seed's Milk Paint

Mustard Seed Yellow

Sooo much better! We'll be changing out the rug eventually, but it fits our home so much better now. Which is one of the things I love about painting furniture. It's ok if your original vision doesn't turn out as planned. Just pick up a brush and try again!

Mustard Seed Yellow

Thursday, July 11, 2013

Side Table Makeover

I knew that despite living in a cramped apartment for 3 months, there was going to be no way I could not paint. Something. Heck, the very last thing I packed in my Jeep was my stash of Annie Sloan paints & waxes. I even strategically arranged our storage area...the things I intend to paint are all accessible.

First (and easiest to reach) was a little side table I picked up at Goodwill a few years ago on the cheap. It was either $6 or $12. I painted it cottage white and distressed it. It spent several happy years in our living room.


I decided to go with Aubusson Blue and Antibes Green, because: 1)  I have like a gallon of Aubusson. And, 2) while I've always been a little scared of Antibes, I've been seeing it alot lately and it's growing on me.

I'll admit, my first attempt wasn't great. I didn't quite achieve the look I was going for. (What that look was, I still don't know).


My sister hated it. Mr. VB gave it the ol' stink eye every time he walked past it. Even Allie and Marley wouldn't look at it.


I knew I had to try again.

I stuck with the Aubusson on the outside, with a surprise of Antibes inside. A coat of dark wax gave it the old and antique look (and tones down the green).


I distressed it a bit so a little Antibes peeks thru in different spots. That's what I love about painting furniture and ASCP...it's pretty hard to mess up. And, if you do, just start over.


Next up is a dresser similar to Miss Mustard Seed's below. I have one almost identical. I haven't tried her milk paint yet, but can't wait. I love the chippy look it gives to furniture. Stay tuned!


Linking to: Anything Blue Friday at The Dedicated House.

Tuesday, August 30, 2011

Breakfast Table Gets a New 'Do

I am excited to be back {again} from a hiatus. Well, maybe I've been working on this project for two months. Or, maybe the hours of sanding ust felt like months!

I repainted this set almost two years ago. In decorating years, that's like 17 years. Here's how it has looked since it's last paint job:


So, we dragged it out to the garage for a little TLC. Here's a closer look at the top. Not digging the stain.


So, I took out my BFF (my little palm sander) and, with 80 grit paper, started sanding. And sanding. Then I sanded some more. And it started to look like this.

After about an hour, I had one WHOLE side sanded. At this rate, I'ld be done just in time for Thanksgiving dinner. 


Then, the unimaginable happened. My BFF overheated. RIP little guy.


So, I headed out to Home Depot and got a new BFF.

A BFF with a lifetime warranty.


And, I started sanding again. My new BFF is stronger and much faster. And comes with 60 grit paper.


I got it down to the bare wood. To make it smooth, I went over it again with a 100 and then a 220 grit paper.


At first, I was going to stain the top. But, I've always loved what Layla at The Lettered Cottage did with her dining room table, so I ditched the staining plans and went for paint. I made a whitewash mix of 50/50 water and white paint (Swiss Coffee by Behr is a staple in our house).

Here's what it looked like after a couple coats:


Here's when things got a little crazy. I wasn't really liking this look, so I did a couple of dry brush coats with the Swiss Coffee (without water mix). For dry brush, dip your brush in the paint, wipe most of the paint off and paint away. Then I got out  my little jar of Valspar Antiquing Glaze and lightly painted some on. A little goes a long way!


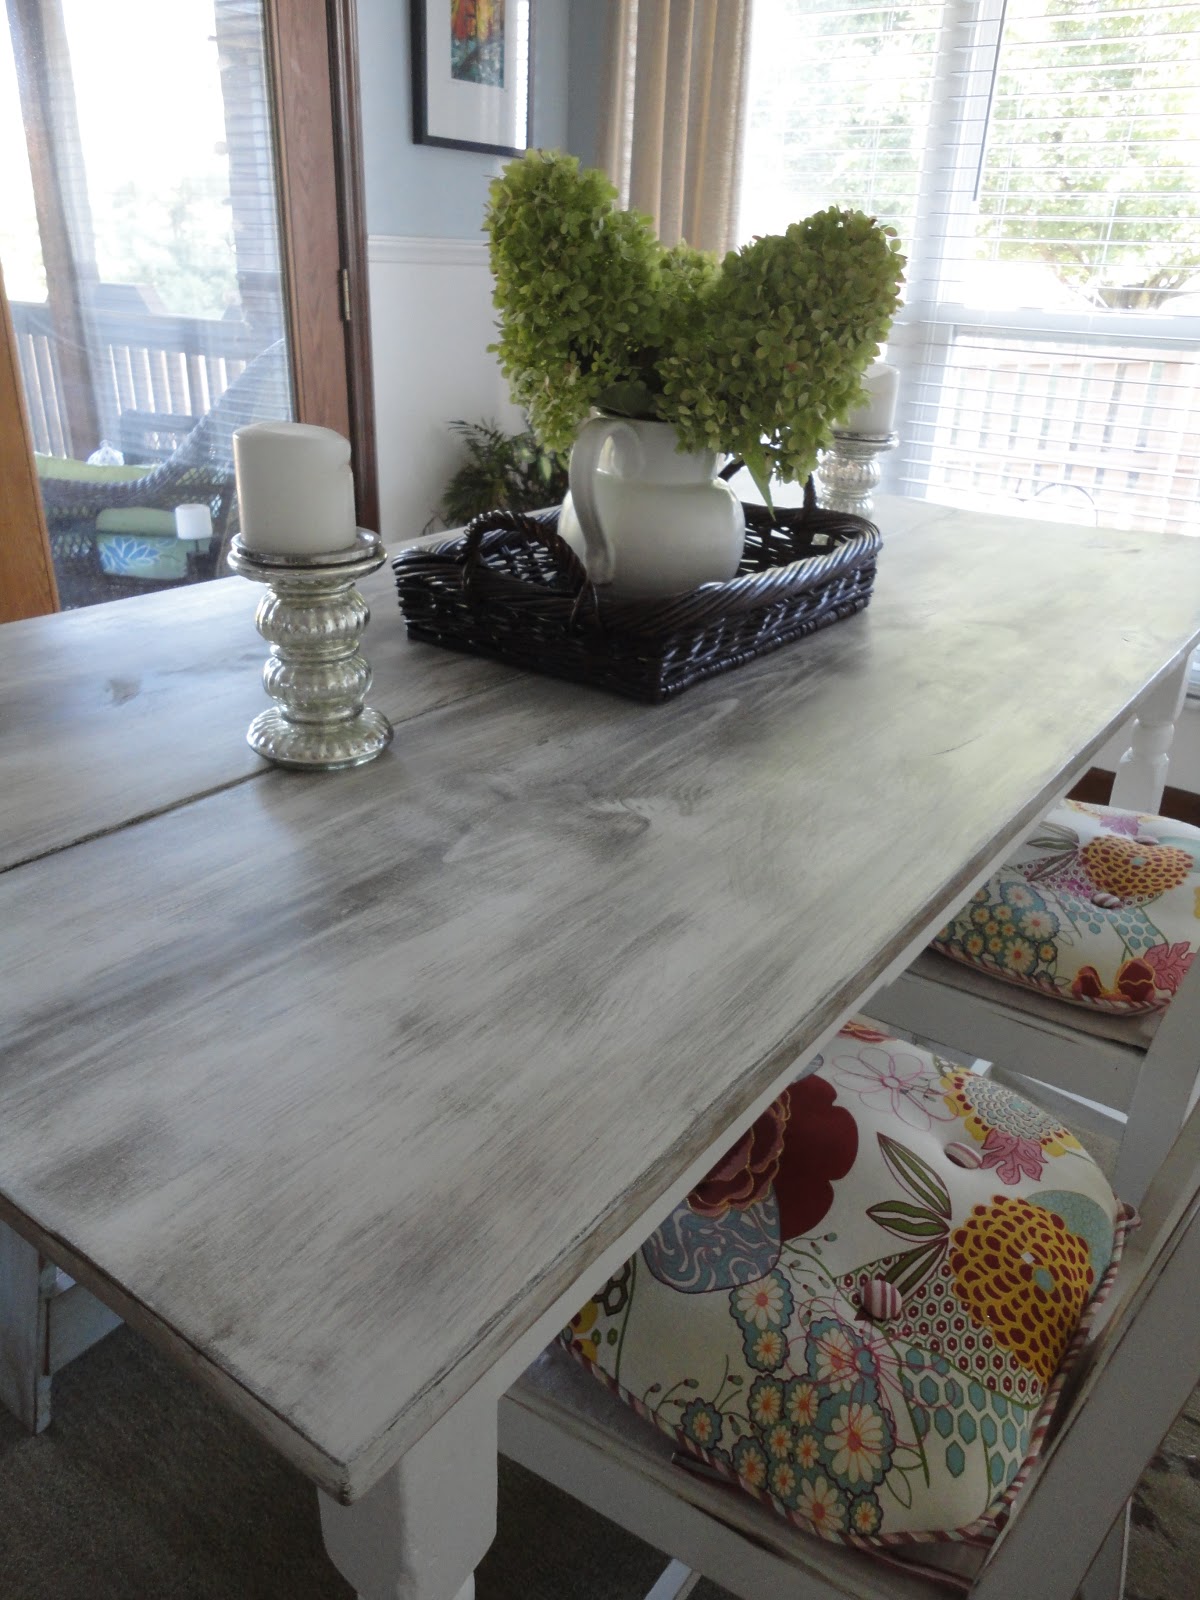
I did another coat of the whitewash and this is what I was left with. Pure LOVE!

But, wait -- I'm not done!


It was a little harsh, so out came my BFF again and using the 220 grit, I lightly sanded and smoothed out the table. Ta-Da!


I also gave the legs a coat of Swiss Coffee (getting rid of the previous distressing). I love the way it turned out!


My bench and chairs are a bit off, now. I'll be making some changes to those soon. But, I love the new look of the table. What do you think?

Linking up to a few parties this week!


Photobucket